It doesn’t need to be winter quarter to feel the winter blues. As the weather gets colder, curling up inside with a hot, home-cooked meal becomes ever more appealing. Only problem? You don’t know the first thing about cooking.
Never fear: Fourth-year Alex Ye, founder of the student-run supper club Nous, walks us through customizable meat-and-veggie staples. Roll up your sleeves, put on your oven mitts, and get cooking.
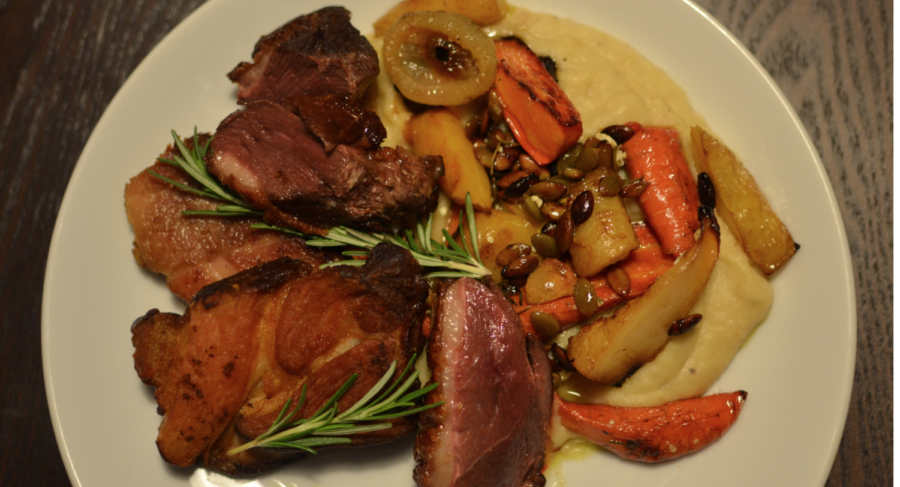
Meat
Typically speaking, what makes meat tough is the amount of collagen it contains. If undercooked, this connective tissue makes meat chewy and unpleasant. However, when broken down, it contributes to the succulent, lip-smacking tenderness of favorites like smoked brisket, roasted leg of lamb, and cha shao pork.
Cooking these tougher cuts of meat all follow the same formula: Optimal tenderness is an inverse relationship of temperature and duration. Decent results are achievable through a common oven without resorting to more complicated techniques like precision cooking (e.g. sous vide) or pressure cooking. Some cuts that you can find at the supermarket include pork belly, pork shoulder, lamb leg, and beef chuck roasts. These tougher cuts tend to be cheaper than their more tender counterparts and require minimal active cooking time.
Step 1: Select your meat.
Generally, fat is your friend. Select your cut based on how much marbling you can find. This will add tenderness to your end product by both increasing moisture through fat and lowering the density of protein that is packed together. Aim for size, which tends to be more forgiving for this cooking method.
Step 2: Brine. (Recommended)
Unless you’re aiming for crispy crackling, brine your meat. Water-soluble ingredients like salt and sugar will penetrate and season the flesh. This could be a pure salt brine, or a salt and sugar brine. On a regular basis, there’s no need to follow a strict ratio or recipe. Add peppercorns, citrus zest, or whatever your heart desires. You should brine tougher, redder meats for longer to achieve proper flavor penetration.
Step 3: Slow roast or braise.
When cooking in an oven, your meat’s internal temperature should be anywhere between 140–180 degrees Fahrenheit. Given the uneven heat distribution of an oven, try to maximize the proportion of your cut that is cooked properly at a collagen-breaking temperature of 160–180 degrees for a sufficient amount of time without overcooking the rest. You can do this by setting your oven to its lowest setting, usually around 170 degrees.
Cover or wrap your meat in foil or an enclosed container to minimize water loss. Cook for a minimum of four hours and up to 15 hours—lower temperatures naturally require longer cooking times.
From here, you have two options: slow roasting or braising.
Slow roasting is the process of cooking your meat at a low temperature without added water. Either covered partially or fully, slow roasting seeks to minimize water loss from the meat while letting fat render and baste the meat. This will yield a texture like a prime rib roast or classic competition slab of pork ribs, featuring some resistance from the remaining, but partially denatured, collagen. (You could also create a baste for your meat, which is a liquid with varying amounts of acid and sugar. This should be applied periodically throughout the process for a glossy, caramelized finish that also inhibits further dehydration of your meat.)
Braising involves minimizing moisture loss by adding a flavorful liquid to your meat as it cooks. To make a braising liquid, start by gently heating or caramelizing any combination of garlic, onion, and spices in a pan with your choice of fat, then add wine, beer, and/or anything from stock, scraping up any brown bits at the bottom of your pan. From there, feel free to add any other fresh herbs or spices.
The water within the meat will exchange soluble particles with your braising liquid, imparting both moisture in the form of water and flavor in the form of salt and oils of any spices you add. Braising creates a fall-apart texture, but the braising liquid absorbs dissolved collagen from your cut, rendering it leaner than a slow roast. Again, cover your meat with foil to minimize moisture loss.
Produce
Broadly, there are only starchy and watery produce. Roast and mash starchy produce like potatoes, celery root, and butternut squash as a hearty side dish to your hunk of meat, and quick pickle, pan sear, or toss watery vegetables in a salad for a crisp contrast. (That being said, who am I to tell you that you can’t pickle potatoes or purée celery? You can, and they’re delicious.)
Roasting
Step 1: Prepare.
Cut your produce into bite-sized pieces. Opt for irregular shapes for maximum crispiness. You don’t want your pieces so small that they shrivel up into starchy crisps, and you don’t want your pieces so large that they’ll cook unevenly.
Step 2: Partially cook.
Start your starchy vegetables in cold, salted water and bring to a boil; cook until fork-tender. Strain and toss in a colander so the collisions and friction cause the surface of the pieces to scratch and create more irregularities. This will maximize the areas where fat can cover for a crispier edge.
Step 3: Roast
Lay aluminum foil on a sheet pan for easy cleanup later. Layer your veggies, cut up some (or a lot) of unsalted butter, and distribute them around the pan. Season with a splash of vinegar, salt, and sugar (optional). Add any fresh herbs, garlic, or spice at this time. Roast at 350–400 degrees until brown, or about 30–45 minutes. Stir or flip occasionally for maximum color.
Mashing
Step 1: Prepare.
Cut root vegetable into even-sized pieces for even cooking. Size about twice that of a roasting cut.
Step 2: Partially cook and boil.
Cook in salted water at 160–175 degrees for half an hour. This preserves the integrity of the cell walls of the starchy vegetable to prevent from a waxy consistency. Then, crank the heat up to the highest flame your stovetop has to offer. Cook until fork-tender.
Step 3: Mash or purée.
Whether you use a fork, potato masher, hand blender, or potato ricer, there is no proper way to obliterate your starch. Rotating blades will tend to break cell walls and yield a more sauce-like purée, while something more rudimentary like potato masher will yield a chunkier, heartier mash.
Watery Produce
Option 1: Quick pickle.
On a medium heat, mix vinegar, sugar, salt, and additional optional flavorings to taste. Pour over slices of your vegetable. Wait at least 20 minutes. The thicker you slice, the longer the pickling process takes.
Option 2: Pan sear.
There are three common types of fat for the pan: neutral oils (like grapeseed or peanut oil, which have neutral flavor), olive oil, and saturated fats (like butter or pork fat). If adding garlic and spices, know that they might burn in high temperatures and long durations. Add garlic near the end of your process to prevent an acrid, burnt taste. Generally, fresher spices with more water burn less easily, while their dried and ground versions will burn much more quickly.
For neutral oils, place into a hot pan before dumping in your vegetables, seasoning simply with salt and cooking until charred and blistered.
For olive oil, add to a pan on medium heat, fry some slices of garlic, then quickly sauté thin slices of your vegetables for a quick, simple preparation. Don’t aim for any color, as olive oil tastes unpleasant when cooked harshly.
Cooking with butter and pork fat makes this closer to roasting than the previous methods. Maximize brown, crispy bits and heavy, meaty aromas. When cooking in a shared living space, generally don’t heat your fats high enough for them to smoke. I recommend adding butter early at a medium-high temperature, and adding slightly thicker slices of your vegetables once the butter starts to bubble. Cook until blistered, browned, and toasty.
Browning in butter occurs when the whey protein in the butter reacts with sugar, creating alluring nutty aromas. Pork fat is similar process. Bring to a high heat just below smoking, and fry your vegetables until a crispy brown crust forms. Pork fat is much more forgiving, so feel free to get the pan ripping hot. It will not brown, since there is no protein to react, but the high heat will blister your veggies, and the pork flavor will help season your vegetables.
Tip: Add hazelnuts, pine nuts, peanuts, pumpkin seeds, and more for a more complex flavor profile. Make sure these have contact with your salt for a lovely textural contrast.
Option 3: Salad.
Slice your vegetables thinly, and dress with vinegar, oil, salt, and other flavorings to taste. But add your ingredients conservatively first—be wary of the acid, salt, and sugar contents of sauces like soy, balsamic, fish sauce, or Worcestershire when seasoning your salad.
Seasoning should hardly be an exact science, but understanding the balance between salt, sugar, acid, heat, and aromatics through trial and error is part of the process for both the professional and home cook. The endless interactions among these elements are what make cooking an endless journey of experimentation. Be ready to toss (or eat) your failed creations and take note of what went wrong for next time.